Enabling the CHPS Extension |
  
|
Enabling the CHPS Extension |
|
After completing installation you'll need to check you have successfully installed the CHPS extension. To do this open ArcGIS desktop;
1.Start > All Programs > ArcGIS > ArcMap 10.x ![]()
2.Before the ArcMap window opens you will be presented with the ‘CHPS Database Connection’ dialogue
3.By default the CHPS extension will not be enabled as part of the installation process. However, when ArcMap opens you will see the CHPS toolbar with greyed out tools.
![]()
|
IMPORTANT NOTE: |
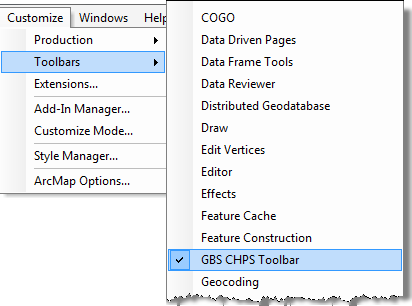
If you cannot see the toolbar you must select a. ‘Customize’ > ‘Toolbars’ > ‘GBS CHPS Toolbar’
|
4. To enable CHPS extension you must select ‘Customize’ > ‘Extensions’
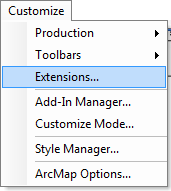
5. Tick the box next to ‘GBS CHPS’
![]()
6. Close the dialogue to return to the main ArcMap screen.
7. To start using the CHPS tools, click on the 'Enable CHPS' button (first button on the left of the toolbar). Clicking it will turn the button green and other CHPS tools will no longer be greyed out.
![]()
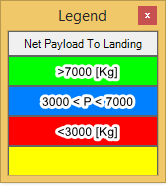
NOTE: The Legend box should also appear upon clicking the 'Enable CHPS' button.
NB: If the first three tools are still disabled please check the Units set in Data Frame Properties in your current ArcMap session.
http://cableharvesting.com/help//3-Accessing_CHPS_in_ArcMap.Enabling_the_CHPS_extension.htm
Topic Last Updated: Tuesday, 13 September 2016